| |
| |
Chapter Two - Setting Up the Desktop
Although it might not seem important at first, properly setting up your desktop can save you a great deal of time in the often repetitive tasks that web authoring involves. The latest operating systems for Windows and Macintosh allow you to "drag-and-drop" files across applications, neatly popping them open in the target application. You can also use this method to upload your files to remote server directories using FTP clients, and to drag down images from Netscape and other browsers. If you follow a few simple steps, you can use these tricks to cut your web authoring time in half.
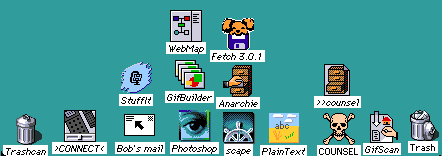
Take a look at the desktop in Figure 1. This is the bottom of my desktop, and it is organized to simplify the tasks I use most. The images are icons, not the actual programs, but "aliases" of the programs which I've filed away on my hard disk. Aliases (or "shortcuts" as they are called in Windows 95) are created by selecting the icon for the target application, and pressing apple-M ("make alias") or pressing the right mouse button in Win 95 and selecting make shortcut. Next drag the new alias icon onto the desktop, and place it along the bottom of the desktop.
figure 1
A peek at the bottom of the author's desktop
Why the bottom of the desktop? Because you can easily resize your windows in Netscape, Anarchie, and so forth to leave a small strip of desktop showing in the bottom of the screen. This will allow you to do three things: (1) click on this strip to quickly access the finder (explorer in Win 95) no matter what application you are in, (2) quickly open the applications you use most frequently, and (3) easily drag files across these applications to open them in that application.
Win95 Tip: right click on your taskbar clock to quickly "minimize all windows." Now you can access all your common shortcuts within two clicks. Or drag directory and program icons over the start button to keep essential resources handy on your start menu.
When you open a folder and resize it on a Macintosh, it will stay that size and in that place until the next time you move it, even if you close it. This allows you to arrange your open folders where they'll do the most good. And if these folders are open in the finder (and you set your control panel to allow you to see the desktop in the background), you can click on say Anarchie, then click on the finder (down the bottom), and then drag a file from one to the other. Viola, you can now instantly upload or download right to the target folder, without using any menu commands!
Look again at Figure 1. You will see an icon called "counsel." You can't tell, but it's a folder (you can change an icon - just select the file/application, select "get info," and highlight the icon in the info window. Copy this icon to the clipboard (hit apple-c) and do the same to the icon you want to paste it to, but this time hit apple-v.) Anyway, the folder called "counsel" is an exact copy of my entire web site.
Why do I have a copy of my website on my desktop? Because I can easily make changes to my web pages, then when I'm happy with the result, I can upload them to my server. It saves a lot of time, since pages load instantly, and you never have a problem with your internet connection. It's a good idea to have this folder pop up in a place that makes it easy to drag its contents across your ftp client. To make my job easier, I always leave my web folder open on the right of my desktop, and my ftp client on the left. You may want to set it up slightly differently, feel free to experiment.
You can place any icon aliases you like at the bottom of your desktop. I use the ones you see most often, so they are the ones that make most sense. The ones I use a bit less frequently are still on the desktop, but they are above the others. I also made an alias of the trash, and placed that on the other side, just so I always have a handy place to dump my garbage.
There are a few other tricks you can use to make your job easier. When you open Netscape (no offense to MSIE, that's what I use, you can translate this as "your favorite browser"), the first thing you want to do is to maximize your browser. Do the following:
MAXIMIZING NETSCAPE
- OPTIONS - deselect "autoload images" (you can always load them if you want them - the time saved is considerable, and if you autoload images, the browser will get them fresh each time, even if they haven't changed. If you load them manually, they will stay there until you flush the cache, or the cache flushes itself to make room)
- OPTIONS - dump the directory buttons - they are redundant, as they are all in the Directory menu.
- OPTIONS - GENERAL PREFERENCES - APPEARANCE - make your toolbar text only - you don't need those silly pictures. (If you're really good, you'll memorize the keystrokes and get rid of the toolbar entirely!)
- OPTIONS - GENERAL PREFERENCES - APPEARANCE - make your homepage your homepage. If you don't have one on the net, you can select your own on the desktop. Load it in Netscape (drag it across the icon or open window, then copy the URL right into the spot in the preferences spot for homepage).
- OPTIONS - GENERAL PREFERENCES - APPLICATIONS - select your own text editor (i.e. Plaintext, or Wordpad) in the view source setting.
- OPTIONS - NETWORK PREFERENCES - CACHE - Make your cache a reasonable size - if you have terabytes of extra room, set it at a healthy 5, 10, even 20 Megs. This is disk cache, it won't affect your ram in any way.
- OPTIONS - NETWORK PREFERENCES - CACHE - Select "check documents every time."
- Resize your browser window to fill the entire desktop, except for a small strip across the bottom.
- MAC USERS - SAVE OPTIONS!!!
Now, there is only one more trick to making web authoring a snap. When you open a file in your text editor, resize the window so that there is a slight strip along the right side, and so that it extends just a bit below the Netscape window. If you do this properly, you will be able to easily toggle between the two by clicking from one to the other. This will allow you to quickly change-save-reload to check your changes as you go along.
There, that ought to get you ready for the next chapter, where we finally get into the nitty gritty of web page programming!