 Classroom Crafts
by The Teachers.Net Community
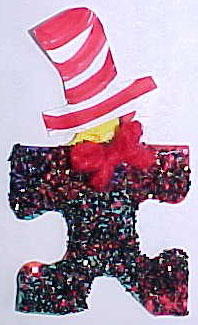
A Cat in the Hat Pin for Read Across America Day

Made from one jig saw puzzle piece.
- Spread a thin layer of white glue over all but the "head" of the puzzle piece and press it into a mixture of glitter (I used predominately black glitter with a bit of red and gold mixed in).
- Hot glue on a tiny bow of red yarn.
- Cut the hat from white paper. Color with a red, fine tip marker pen.
- Hot glue a jewelry pin on the back (Jewelry pins are available in the crafts catalogs and in the crafts section of most department stores).
VOILA! A Cat in the Hat pin for Read Across America Day!
Note: Pieces from 1000 piece puzzles are too small, the 250 piece size works well. I haven't tried it, but I think the 100 piece size would make an awesome pin! If you don't have enough pieces formed properly to make the 2 legs at the bottom, simply cut out the shape of the legs as I did on the one pictured.
Kathleen Carpenter
Snow People

Had to share these adorable "snow people" the children made in our winter camp program today. I took digital photos of the children's faces and after printing them out I cut the photos into a circle which fit in the middle of a coffee filter. I glued each child's coffee filter picture on a black 11x14 piece of construction paper. The children then used white paint to paint on the rest of the "snowman's" body. I used the bottom of strawberry baskets to make snowflake stampers and the children painted these white and printed snowflakes on the page. Then they sprinkled with some silver glitter and voila...a Snow - Emma; Bobby; Eliza etc. I did this activity with 3's and it was very in sync with their abilities. I have to tell you that these got lots of "oo's" and "ah's" from the Moms when they picked up today and the children had lots of fun making them.
Leslie
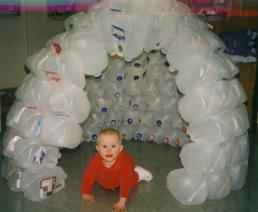
Milk Jug Igloo

Photo of a milk jug igloo constructed by Britt/PA
When I first started I used to cut the gallon size milk jugs in half and use only the bottoms. It was rather flimsy and need shoring up. Then I read about using the whole jug and Ta - Da!! It worked like a charm.
I do prefer to glue to a piece of cardboard. I purchased two "project display" boards at Staples and taped them together. Last year I didn't do this and the igloo wasn't quite as sturdy.
On the cardboard lay out 25-26 jugs in a complete circle. Caps pointing in. Remove 3-4 for the entrance. Glue the remaining jugs to the cardboard and each other. I use High temp glue. Have a lot of large glue sticks on hand..You'll need them.
Continue to add jugs row upon row. I usually go up three or four rows before I go over the entrance. After that keep adding jugs bringing them in toward the center a little more each row till you end with several filling in at the very top.
It takes at least several hundred jugs so start collecting. I usually start asking parents to save them in November and start bringing them in in January. The igloo is very sturdy and moveable. I use it only for quiet reading for two students. One year I took only the top rows off and stored the bottom. The following year I started from where it left off.
Clean jugs are a must. I usually do one row at a time each day so the glue will harden well.
Mary K/ma
Snowman Heads
We make cute snowman heads from paper plates the children decorate them with construction paper and buttons, we add bows at the neck from torn strips of fabric. We punch holes in either side and tie them all together with raffia to display garland style in our hall. They name them and write a sentence about them on a small card that is attached at the bottom.
Lisa
Sock Snowman

To make this snowman, we stuffed a clean white sock with cotton batting. Add some sand in the bottom of the sock to help it stand upright before stuffing. We placed rubber bands to section off the head from the rest of the body about 1/3 down. Then another one about 2" from the top near where the ankle part begins. Then we fold over that top part to make the hat. We glue on googly eyes on the head portion, use foam/felt/laminated paper for a hat on that top folded over part, and foam pieces for the boots in the bottom section. Add felt pieces for mittens, glue buttons in middle section, and a pipe cleaner or foam piece for the nose. We draw in the mouth. You could make it in 3 sections too but the rubber band doesn't always stay. You could vary the decorations to match with what you have in classroom. The kids love it. They write stories about their snowman as well.
Sandi
| 
