

Marvelous Magnetic Fields
- Science
- Elementary
- Activity Time
- Materials
- Concepts / Topics
Overview
Subject: Science. Grade level: Second Grade.
Students will discover that magnetic fields can reach through different objects. They will complete three investigations to make their discoveries.
Objective
Upon completion of the lesson, students will have a greater understanding of magnetic fields and the strength of magnets.
SCSDE Curriculum Standards Addressed
- I.B.1.c. Use simple equipment, such as hand lenses, thermometers, balances, rulers, etc., to gather data and extend the senses.
- IV.B.1.a. Investigate and classify the result of magnetic forces on common objects (metals/nonmetals).
- IV.B.1.b. Demonstrate and describe how the poles of magnets attract and repel each other.
Materials and Resources
- “Wooly Willys”
- Ring magnets
- Cow magnets
- Magnetic field cards
- Paint
- Paper
- Box tops
Introductory Activity
Hold up a Wooly Willy game and ask students, “Have you ever seen a Wooly Willy before?” Show them how to use it and ask whether they have any guesses about how it might work.
Procedure
- After the introductory activity, ask students whether they know what a magnetic field is. Prompt their conversation by asking whether they can see the magnetic field.
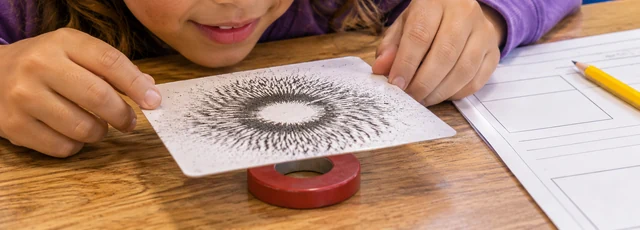
- Show students a magnetic field card. Explain that a magnetic field is an invisible force that surrounds a magnet.
- Explain that students will complete experiments to test and observe magnetic fields.
- Review the rules that must be followed when doing science experiments.
- Explain the stations, how much time students will have at each, and how they will rotate.
- Separate students into heterogeneous groups and tell each group which station to start at.
- Keep track of the time. Ring a bell when students have five minutes left at a station, then give a signal when it is time to rotate.
Station Directions
Station 1: Wooly Willy
- Pick up a Wooly Willy.
- Give Willy a new look.
- Think about how this game works.
- Read and record your answer on your Investigation Sheet.
- See how many new looks you can give Willy until you hear the bell.
- When you hear the bell, clean up your station and get ready to rotate.
Station 2: Magnets Under a Box Lid
- Sit down around the table.
- Watch, listen, and wait for your turn.
- When it is your turn, take the cow magnet and move it around under the box lid.
- Think about how this works.
- Read the question and record your answer on your Investigation Sheet.
- Continue to share until the bell rings. When it rings, clean up your station for the next group and get ready to rotate.
Station 3: Magnetic Field Cards
- Pick up a ring magnet and a magnetic field card.
- Place the ring magnet under the card.
- Look at the magnetic field.
- Can you make the magnetic field get bigger or smaller?
- Read the question and record your answer on your Investigation Sheet.
- Continue to experiment with the ring magnet and the card until the bell rings.
- When the bell rings, clean up your station and get ready to rotate.
Adaptations
Place students in heterogeneous groups so they can help one another. Move from station to station to answer questions. Place directions at each station to support understanding.
If a group finishes answering the questions at its station, students can continue to experiment with the materials until the first bell rings.
Closure
After students have rotated through each station, have them return to their seats. Review the Investigation Sheet with the entire class to ensure that everyone understands magnetic fields and their properties.
Ask students to think about the question from the beginning of the lesson: “Do you think a magnetic field can reach through some objects?” Explain that it is okay if their guess was wrong. Sometimes they will make guesses while doing an experiment; this is called a hypothesis. Explain that it is not a bad thing for their hypothesis to be wrong because it is a guess about what will happen.
Assessment
Assess students informally through observation. Watch for students staying on task, cooperating with group members, respecting station materials, and demonstrating an understanding of magnetic fields.
Students will also complete a worksheet as they move from station to station. Review the sheet to identify which students understand magnetic fields.
Magnetic Fields Investigation Sheet
Name _________________
Directions: Answer the questions as you go to all three stations.
Station 1
- Why do the tiny pieces of iron stick to the end of the red stick?
- Why do the pieces of iron fall down when I pick up my “Wooly Willy”?
Station 2
- Can a magnetic field go through some objects? Y / N
- Tell what happens to the ring magnet when you move the cow magnet under the box.
Station 3
Draw a picture in the box below that shows what the magnetic field card looked like when you put your ring magnet under it.
Teacher Reflection
Wow, this lesson was exhausting. I love for students to get to work cooperatively in groups because it simulates real-world situations. It is important for students to be able to work together and be successful. The students loved this lesson because they got to experiment on their own within their groups without me telling them what to do every second. They really did a pretty good job considering their age and that they do not get to work in groups regularly.
The activities went smoothly, but I will make two changes before the next time I do the lesson. Next time I will place the ring magnet in a plastic sandwich bag, and I will get some art paper for the magnet painting station.
Teachers.Net · https://teachers.net/lessons/3923.html